As with comedy, harvesting milkweed seed is all about timing. Too soon and the seed will be immature and won’t germinate, too late and it will have either blown away or involve a flossy mess you’ll need to deal with before sowing. Here we’ll explore some methods of harvesting milkweed seed, separating the truth from the fluff.
If you’re reading this, you’re likely aware of the fact that milkweed has been disappearing from the landscape over the past decade – with monarch butterfly populations declining as a result. While there are many factors contributing to the monarchs' decline, loss of milkweed – the plant they use for breeding – is a leading factor, and luckily one that we can all work to reverse by planting milkweed in our home gardens, farm fields, or even unexpected places such as parking medians.
While you can certainly buy milkweed seed from a variety of suppliers, harvesting milkweed seed from local species is a great way to ensure that you are working with plants that are well adapted to your climate and soil conditions. When collecting seed, always make sure you have permission from the landowner (if collecting on public lands, for example, a permit may be required) and never disturb or remove the plants themselves.

When to collect milkweed seeds
Milkweed plants produce distinct seed pods in late summer. Typically, these pods are horn shaped, or otherwise long, narrow and tubular. Pods are filled with seeds and floss, a material attached to the seed that allows it to travel on the wind, similar to dandelion seed. This floss is so plentiful it was once used to fill flotation devices during World War II, when the supply of another material was cut off by Japan. For many years the floss has been explored for other commercial uses such as mattress and pillow filling.
When the seed is ready to disperse, the floss will expand, causing the pod to burst. For those wishing to collect seed, this floss can be problematic, creating a messy barrier to gathering large amounts of viable seed. There are several options for separating the floss, but the best option is to plan your timing so that you are able to easily remove the seed as soon as it is mature, but before the silky floss has expanded.
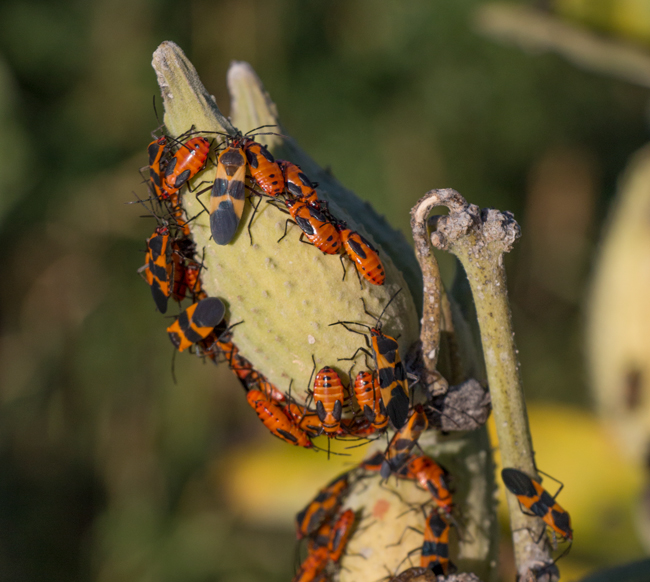
First, look for milkweed bugs – red and black insects that eat milkweed seed. While they do no harm to the plant, if a pod is covered in these insects it’s likely the seed inside is no longer viable and those pods should be avoided.
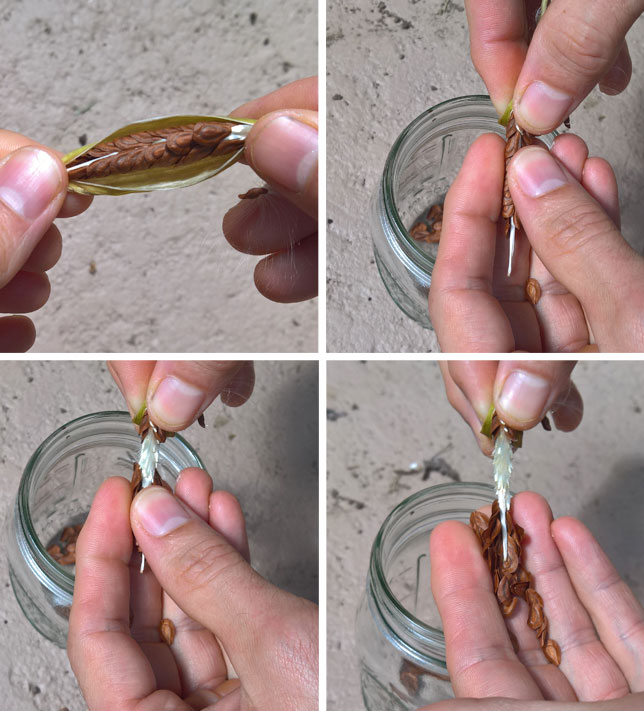
Milkweed seed should be brown and leathery when mature, though the pods themselves may still be green. You can test an unopened pod for maturity by applying gentle pressure to the seam. If it does not open readily, the seed inside is immature.
How to collect milkweed seed from a pod
If instead the pod opens, and seed is dark brown in color, you may easily remove the central rib of seeds and floss in one mass, and should find it easy to separate. From here, pinch the seed mass towards the top of the cluster, and remove the seed with your other hand (the seeds should fall away easily). Move your thumb and forefinger down the mass of floss as you go, working your way down the seed mass. You should end up with a pile of seeds and a ribbon of milkweed floss that can then be discarded (or tucked inside a pillow).
If you aren’t inclined to poke pods until they’re ready to burst, you may wish to place a rubber band or wire twist tie around a pod, allowing it to split without releasing its seeds. Often, if the pod is still green and has only just “popped,” you may still be able to remove the floss and seed as one cohesive unit without the floss having expanded.
Another option for those who aren’t bothered by the task of separating floss, or who are collecting on a larger scale where checking individual pods is impractical, is to tie a fabric, or other type of fine mesh bag around the pod. Stockings, old socks (without holes!) or organza bags all work well for this purpose – but avoid using plastic bags as they will trap too much heat and moisture, killing the seed. This method allows the pod to split naturally, collecting both seed and floss, and allowing you to get it all on your schedule!
How to clean and separate milkweed seeds from floss
If you missed your window of opportunity and have a pillow-y pile of floss covered seed – don’t stress! In addition to many commercial approaches for cleaning milkweed seed, here are a couple of home-spun options for separating seed:
- Shake it off: Fill a paper bag with your collected seed and floss and toss in a few coins. Shake vigorously. The coins should help separate the seed. When finished, snip a small hole in the bottom of the bag to recover the seeds (and your pocket change). This method allows the floss to be easily disposed of, as it’s already bagged up!
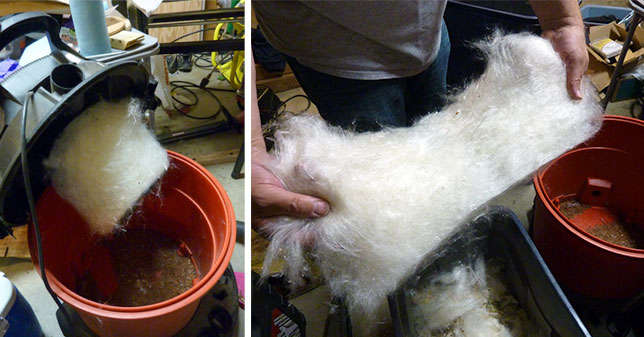
- Suck it up: In our trials we’ve found that a typical shop-vac with a cartridge filter can be very effective at cleaning milkweed seed. In our experiment, small handfuls of seed were fed into a 5.5 HP shop-vac with a 16-gallon capacity. Floss was trapped on the filter while seed was deposited in the canister and easily collected. The floss was then pulled from the filter in a large mat and discarded. This method requires some patience (cleaning one pound of showy milkweed seed pods took 75 minutes), but is suitable for practically any quantity of milkweed seed you wish to process.
- Get craft-y: Monarch Watch has designed a seed and floss separator utilizing a 32-gallon trash can and other materials easily acquired from a hardware store. Large amounts of seed (pods and all) can be loaded into the machine where, with the twist of a handle, barbed paddles inside beat the contents until the seeds are left at the bottom. A shop-vac is then employed to collect floss and pod material. This approach is likely much speedier than using the shop-vac option alone, especially when working with large quantities of seed.
When to plant your milkweed seeds
Most species of milkweed require their seeds to endure a period of cool weather, followed by the warm weather of spring before they will germinate (a process known as cold stratification). For this reason, milkweed seed is best sown in fall. If you’re not quite ready to plant your milkweed seed, it can be stored in a cool, dry place until you are ready, and the cold stratification can be reproduced using a refrigerator.
For more details about collecting, storing, and planting milkweed, read our publication Milkweeds: A Conservation Practitioner’s Guide.
Learn more about milkweed and monarchs
- Visit our Project Milkweed page for regional milkweed guides, and more information about harvesting milkweed seed.
- Visit our monarch conservation page for information about current monarch conservation efforts, regional monarch nectar plant guides, citizen science projects and more.
- For more information about collecting wildflower seed please see our guide Collecting and Using Your Own Wildflower Seed.