Did you know that 30% of solitary native bees nest in tunnels above the ground? Cavity- or tunnel-nesting bees like small carpenter bees (Ceratina species) and mason bees (Osmia species) make their homes inside dead plant stems or in preexisting tunnels like old beetle burrows in trees.
Depending on the species, the female bees will either excavate a new tunnel or take up occupancy of an existing one. She then stores balls of “bee bread” (pollen mixed with nectar) for each of her offspring in individually prepared nest cells arranged linearly down the length of the tunnel, with the oldest at the very end.
Why do some bees nest in plant stems?
Since beetle-bored trees aren’t overly abundant in most landscapes, many tunnel-nesting bee species take advantage of the old, dead stalks of pithy-stemmed plants like raspberry (Rubus species), elderberry (Sambucus species), or even roses (Rosa species), in which they can easily excavate a tunnel themselves.
When she is preparing to start a nest, a female bee will carefully examine numerous old, dried stalks from the previous year’s growth before finally selecting one to call home. From there, she’ll start the long process of chewing out a tunnel down the center of the stem. The depth of the tunnel varies by species, but it may surprise you—I recently rescued a small carpenter bee nest with the last nest cell 10 inches from the entrance! These tiny bees are about 5–7 mm long, so that meant the mama bee excavated a tunnel at least 36 times her body length!
Solitary bee nests in the garden need our protection
Why is all this important? Well, it probably won’t surprise you that tunnel-nesting bees frequently prefer the old stems of pollinator plants for nesting sites. That means that even a small garden may have dozens to hundreds of highly enticing potential nesting sites in a location where human activity could destroy or damage nests.
As most cavity- or tunnel-nesting native bees are solitary, losing the nest an individual female bee worked so hard on could be a devastating setback from which she may not recover, effectively losing her chance to reproduce. This would be especially true for rare or declining species that are much more vulnerable to population shocks than social bees.
It doesn’t have to be intentional destruction. Accidents happen, like falling off of a ladder into a raspberry patch or mistakenly pruning the wrong stem. My family’s ladder incident took out a couple dozen small carpenter and mason bee nests, but usually relocations are limited to nests in a single plant that has to be removed or maybe even sprayed with pesticides.
How to move a bee nest in a plant stem
It seems (to me) only fair to try to save nests impacted by human activity after I had encouraged the bees to settle there in the first place. After several years of experimentation, I’ve developed a system for relocating tunnel nests that has proven to be quite successful in my yard.
By popular request, here’s a quick explanation of the process. Please note that it has not been scientifically tested, only that it has worked better than expected with numerous species, including Ceratina, Heriades, Hoplitis, and Osmia, along with some aphid-hunting and grass-carrying wasps!
Materials
- Place markers of some sort (string, paper, etc.)
- Snips or shears
- A tall pot or bucket
- A small amount of soil or pebbles, enough to fill the bottom 2” or so of the pot
- Flashlight, preferably with a bright and narrow beam
- Optional: fine netting and and rubber bands
Steps
- Determine if a nest is present. The stem will have a hole at the end. It’s not always easy to tell if a nest is occupied, but if the stem is split or cracked, it’s probably no longer in use.
- Temporarily secure the nest if it is in a broken stem or in immediate danger. Really tall stems can be “planted” in place for a day and broken stems can be temporarily re-attached to the live plant using rubber bands or string, (duct tape worked in one instance). You’ll want to place the entrance at approximately the same height and location as it was before, so the nesting bee can find it when she comes back from foraging.
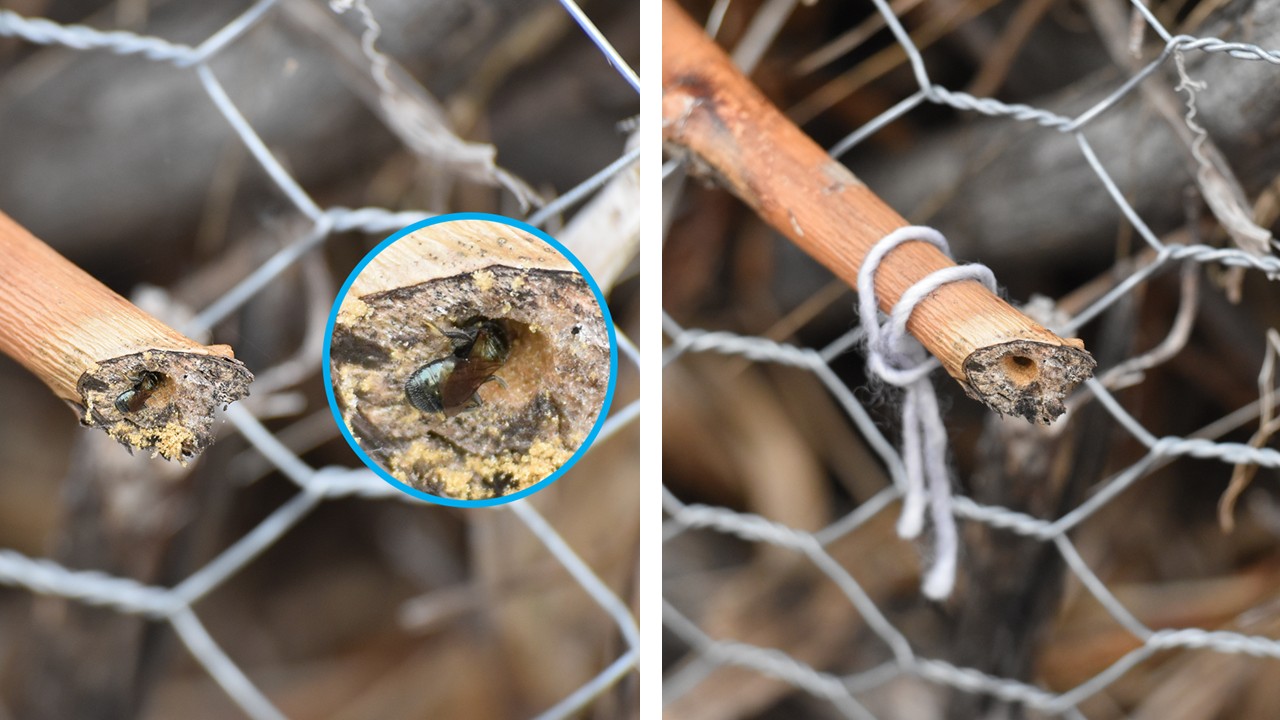
- Mark the nest in a way that will be visible to you at night and won’t impede the nesting bee’s activities for the rest of the day. Light-colored yarn or string works the best in my experience because it’s more visible at night and easy to attach quickly. I tie a piece an inch or two down from the entrance and then cut the ends of the string so they’re not too long. This marker only has to last the rest of the day, so it doesn’t have to be too tight.
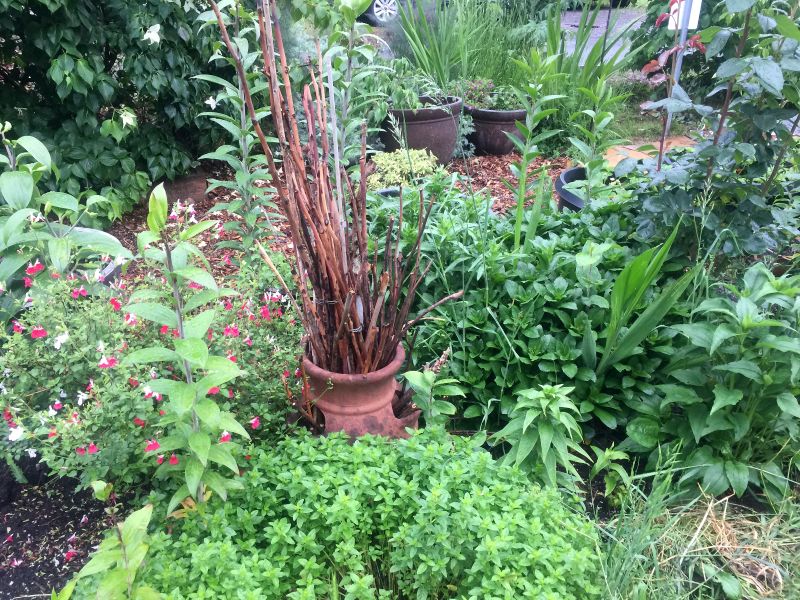
- Prepare a relocation pot. Select a pot that’s at least 18–24” tall with drainage holes at the bottom. Put a couple of inches of loose soil or pebbles in the bottom of the pot. Old strawberry pots are perfect for bundling up broken stem nests of similar height/length that can be placed in the different openings.
- Select a permanent location to move the nest and place your pot there. This site should be a comparable environment (especially light exposure) and within 15–20 feet of the old site, if possible. Smaller solitary bee species may only travel very short distances, so it’s important to try to place the nest within familiar territory so they don’t get lost foraging after relocation.
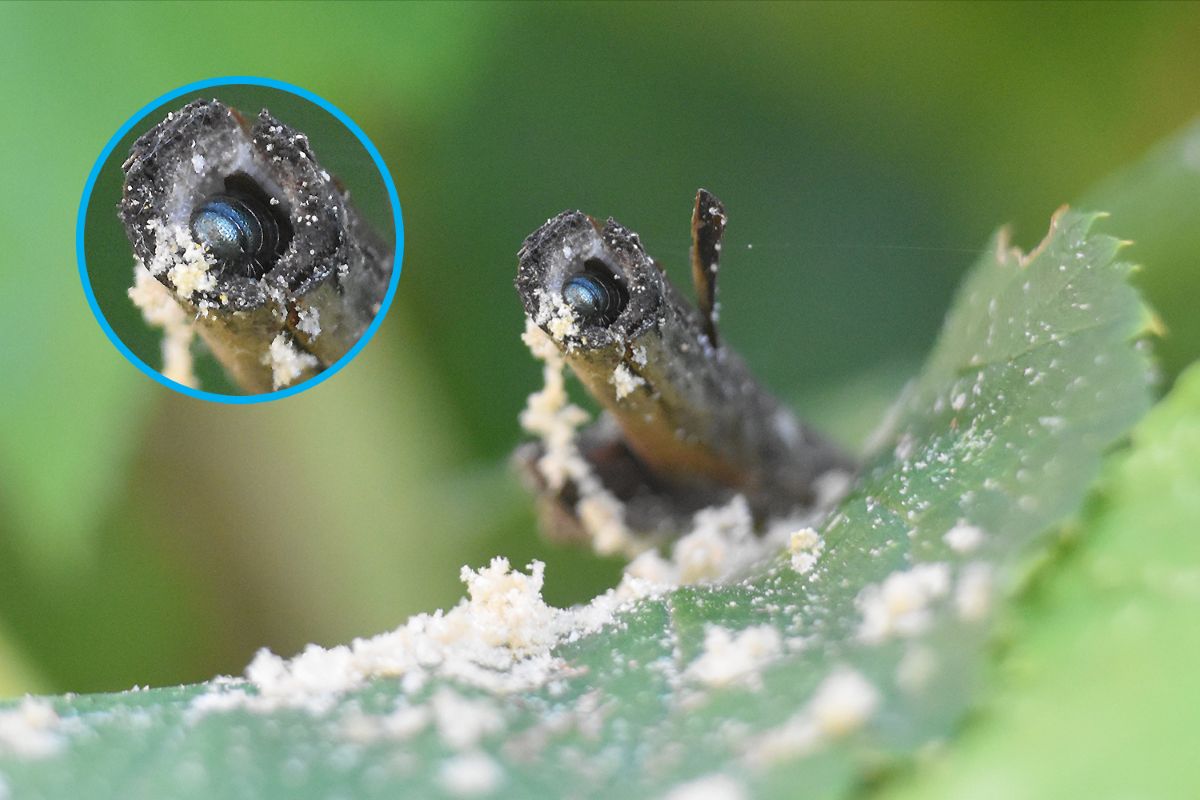
- After dark, confirm the mother bee made it home before moving the nest. She will need to be moved with it. Wait until at least an hour after sunset and point your flashlight down the entrance of the nest into the tunnel. Most tunnel-nesting bees are at least slightly metallic, so they will reflect if the light is at the right angle. Next:
- If she’s definitely in there, proceed to Step 7.
- If you’re not sure, cover the nest entrance with fine netting held in place by a rubber band. Check the nest early the next morning because bees are vulnerable to predators if they get caught in the netting and can’t retreat from the entrance. If she’s in the nest, keep the netting in place while you complete Steps 7–8 and then remove the netting.
- If she’s not there, remove the netting and leave the nest in place for another day and repeat Step 6. If there is still no activity on the second morning, the nest is probably no longer inhabited and can be destroyed by splitting it down the middle.
- Remove the nest. If it’s still attached to the plant, use the snips or shears to cut one to two feet down from the entrance. If the nest hole is over 0.25” in diameter, and you’re somewhere large carpenter bees are found, err on the side of caution and cut the plant stem three feet from the entrance or at ground level if it’s not that tall. If you have multiple nests to relocate, you can make them more resistant to damage by bundling them by length using string or a rubber band, with the entrances at the same end.
- Place the nest or nest bundle in the relocation pot, gently pressing the cut or broken end into the soil or stones to hold the stems upright.
- Check the pot the next day to make sure everything is still where it was the night before and carefully adjust any stems as necessary. Depending on the species in question, they might be easy to spot during the day as they make foraging trips.
How to protect relocated nests
For the rest of the growing season, check on the nests periodically to make sure they haven’t been knocked over or predated and that the bottom of the pot is draining. After one of my mason bee houses was attacked by a racoon, I placed an old parrot cage from a thrift store over the relocated nests and pot to keep predators out.
Observing the relocated nests over time, I discovered that even the shyest solitary bee species seemed to like nesting near each other enough that later-emerging species would come to the pot looking for an available stem, attracted by the other bees. Adding pithy stems over the summer meant that there were always new nests until it all finally got too big to fit inside the parrot cage, so we waited until evening and moved half of the nest stems to another strawberry pot five feet away.
At the end of the season, you can place the nests in a garden shed or unheated garage (if you don’t want to leave them in place as a potential midwinter snack for birds) and then put them back in your garden in the early spring. To prevent the build-up of disease and pests, destroy the previous year’s nest stems by splitting them after you’re sure the next generation has emerged. Unlike a solid artificial nest block, you can repeatedly reuse the pot for relocations every year after washing it thoroughly with a 5% bleach solution to remove any harmful bacteria or microbes.
Learn more about bees and their nests

Sara designs layouts and edits manuscripts for publications, and does a variety of other communications work for the Xerces Society. Sara has previously managed websites for several local businesses and provided technical editing and design services to numerous companies. A graduate of the University of Oregon, Sara is a skilled graphic designer and an avid photographer of native pollinators.